Track Mania Scripting How-To

Recently, I was sent a link to an outstanding YouTube video about someone who trained an AI to outpace them in a racing game. My curiosity was immediately piqued, and I began to wonder if this could serve as a viable platform for prototyping my AI racing driver algorithms. In this post, I’ll provide a concise guide on setting up TrackMania with a script, focusing on the one detailed in the video: Training an unbeatable AI in TrackMania

Track Mania Nations Forever Installation

From my research, TrackMania’s legacy goes back almost 20 years, to 2003. We will be using the completely free version titled “TrackMania Nations Forever.” While this version has its constraints, it’s ideal for our needs. To delve deeper into the game’s history, consult this informative Wikipedia article: Track Mania

The game can be downloaded from:  Track Mania Nations Forever.

The installation process is straightforward, and unless necessary, I’d suggest sticking with the default settings in the installer.


TMUnlimiter

Introduced in 2010, TMUnlimiter added innovative features to the track editor, such as the ability to create oversized maps. If you’re keen on experiencing the three levels showcased in the aforementioned video, you’ll need to install TMUnlimiter along with TrackMania and another tool known as TMInterface by Donadigo.

Download TMUnlimiter from this link: TMUnlimiter Download.

Post extraction, there’s a readme that guides you through the installation.

It’s worth noting that TMUnlimiter necessitates the x86 version of the 2010 C++ redistributable package. If you encounter an error stating it can’t find “MSVCR100.dll”, it means you may have the x64 version and will need to procure the x86 version from Microsoft’s site: Microsoft Visual C++ 2010 Redistributable Package Service Pack 1

Donadigo TMInterface

Next, we have TMInterface, a TAS (Tool Assisted Speedrun) tool for TrackMania. Essentially, it allows users to script everything from car controls to UI enhancements. For a more satirical take, you can check this video: [Warning Satire] [TUTORIAL] How to make TAS (Tool-Assisted Speedruns) in Track Mania

Downloaded from this link: Donadigo’s TMInterface website.

Follow the installation instructions on the website, taking note that the process slightly differs for Steam installations compared to standalone ones.

Running TMInterface alongside TMUnlimiter

Figuring out how to operate TMInterface in tandem with TMUnlimiter took a bit, but I chanced upon a tip on TMInterface website.

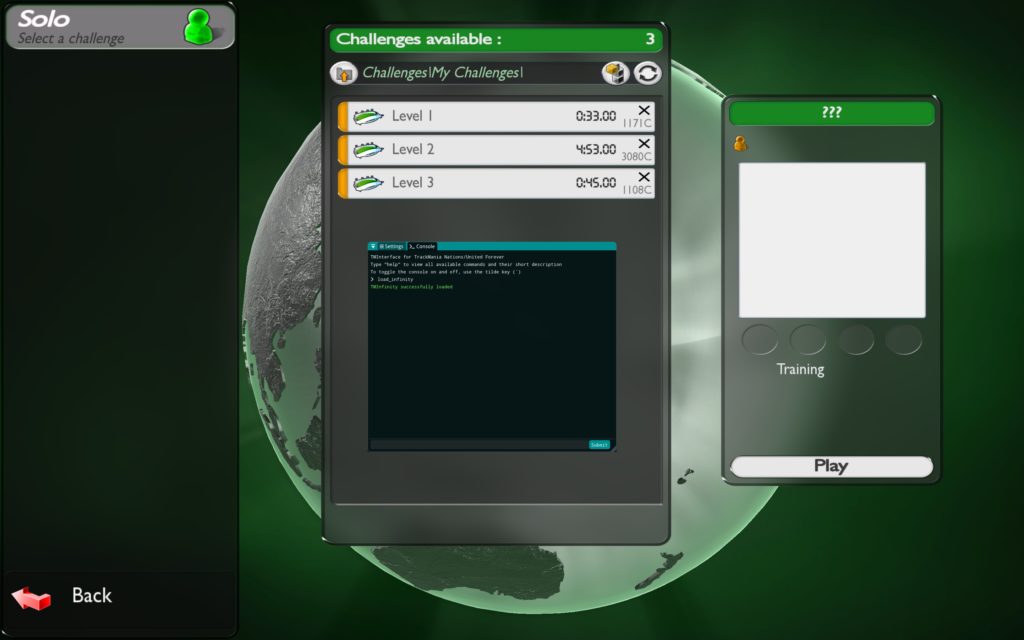
Start TMInterface (execute TMInterface.exe) to launch TrackMania Nations Forever. Before selecting your driver profile, input “load_infinity” in the TMInterface console. Afterward, you can pick your driver profile and access both TMInterface and TMUnlimiter.

Sai-Moen Wallhugger Install

Upon setting up the above, I sought ways to exploit the API for vehicle control beyond the scripting facilitated by TMInterface. In my quest, I discovered a YouTube video demonstrating a wallhugger script. Sai-Moen’s GitHub page has the Angel Script version, a direct adaptation from his original Python Wallhugger script, which is no longer supported or maintained (in the latest version of TMInterface).

To install the Angel Scripts, download a copy of Sai-Moen’s TMInterface-AS module (click on Code -> Download ZIP), which contains a module as well as some other standalone scripts. There are instructions in the README.md but when I did this it was simply a case of copying the Incremental folder and the individual .as script files to the following location: C:\Users\<username>\OneDrive\Documents\TMInterface\Plugins. Substitute your username as appropriate and if you don’t use OneDrive just find your Documents folder. Basically you’ll need to hunt down where your TMInterface\Plugins folder lives.

Running the Wallhugger Bruteforce

To execute a Bruteforce run, complete a run on the track and save a replay (alternatively you can download a replay from the internet).

Example: To save a replay of one of the levels seen in the video, make sure they are installed in the correct location and then:

  1. From the main menu
  2. Play Solo
  3. Browse
  4. Challenges
  5. My Challenges (assuming this is where you installed them)
  6. Level 1 (or whichever you want)
  7. Play
  8. [Execute a run on the keyboard]
  9. Save Replay

Next, from the TMInterface console, go to the Settings tab and down to the Plugins section. You can disable everything except for the “Incremental Module”.

Still in the settings, find the Bruteforce section and select SaiMoen’s Incremental module. Check a few of the settings here including “Maximum evaluation time”. Expand the modes section and make sure wallhugger is selected. Change the other settings as appropriate.

Finally run the bruteforce by:

  • From the main menu
  • Editors
  • Edit a Replay
  • Select the replay you want to bruteforce
  • Launch
  • Sai Moen’s Incremental module

If everything is installed and running correctly, a new console window appears and it will start streaming. This will continue until one of three things happen:

  • The finish line is reached
  • The Maximum evaluation time is reached
  • You hit escape

If a faster time is found, you should have a results.txt to load back into the console (“load results.txt”). Now when you attempt to drive the track again, you will see the bot drive 🙂 Happy TM’ing!
Why did the Mazda RX-8 Engines Start Failing

In this article I intend to continue the story to give you a background to the platform and to illustrate why engines swaps have been popular. As with all of this information, it comes from direct experience or information I have collected over the years. 

Why did the Mazda RX-8 Engines Start Failing? From what I have seen, the reasons behind the failures of Mazda RX-8 engines have spurred many theories. What follows is a compilation of my understanding based on the knowledge I accumulated during my time with rotary engines.

Primarily, the issues revolved around inadequate lubrication and the accumulation of carbon deposits internally. As for the root causes, there is quite a list to delve into – so brace yourself!

Oh and if you are interested in understand what signs to look for when the engine is failing, check out: Signs your RX-8 Rotary Wankel Engine is Failing

Traditional engine lubrication

To understand more about the issue, it’s important to take a quick look at how a traditional engine works. Modern four-stroke engines (found in the majority of gasoline/petrol-based cars) can trace their heritage back to the mid-1800s, originating from the work of traveling salesman Nikolaus August Otto. They have come a long way since then, but oil has remained one of the primary methods for cooling and reducing wear during that time.

In a conventional four-stroke piston engine, the rotating assembly is normally lubricated from the sump – a designated reservoir where oil collects (sumps can either be wet or dry). The oiling system in these engines directs oil straight into crankshaft and piston bearings, ensuring a consistent film of oil for the rotating parts to glide on. Additionally, oil is sprayed onto the cylinder walls and piston wristpin from beneath the piston. This layer of oil helps the piston to move up and down with minimal friction. The piston rings play a crucial role in maintaining a barrier between the combustion chamber and oil chamber. While this seal is highly effective, it is not absolutely perfect; a minuscule volume of oil invariably enters the combustion chamber burnt off. Hence a certain degree of oil consumption in piston engines is considered normal (conversely combustion gases can also enter the oil chamber).

Rotary engine lubrication

In contrast to piston engines, rotary engines present a unique challenge when it comes to lubrication. The rotating assembly in a rotary engine cannot be lubricated using traditional methods,  since the sealing surface between the engine walls and the rotating components is internal to the combustion chamber. Consequently, oil has to be directly injected into the combustion chamber to facilitate lubrication. As the combustion cycle progresses, this is burnt with the air/fuel mix. For those familiar with two-stroke engines, you might already be able to see where this is going 🙂 Unlike burning pure petrol or gasoline, burning oil results in a higher accumulation of deposits.

Engine Carbon Fouling

Carbon fouling of engines is not a novel issue. Decades ago, concerns about carbon build-up in gasoline/petrol vehicles were commonplace. Fortunately, advancements in engine and fueling technologies have brought significant improvements over the years. The introduction of electronic fuel injection was a revolutionary step, making carbon build-up less prevalent in modern engines. However, there was a slight setback with the advent of direct injection vehicles, but that topic merits its own detailed discussion.

As touched on earlier, the benefits of cleaner combustion seen in modern injection vehicles are somewhat negated in rotary engines. The practice of directly injecting and subsequently burning oil in the combustion chamber poses immediate challenges. Furthermore, achieving a complete burn in a rotary engine is more complex, necessitating two spark plugs per rotor. This complexity introduces yet another cause of increased carbon residues.

Apex Seals and Carbon Deposits: A Problematic Combination

What makes carbon deposits particularly detrimental in rotary engines? The issue primarily centers on where these carbon deposits accumulate. Each rotor has what’s known as Apex seals at the tip of each corner. These seals are mounted on tiny springs, allowing them to adapt to the contour of the rotor housing, ensuring a tight seal. However,  any deposits gathering at the rotor tips, where the Apex seals are located, can cause these seals to become jammed, preventing the tips from sliding in and out in in response to thermal expansion.

The consequence of this jamming becomes evident when the engine is hot, making the car difficult to start due to decreased compression. This happens because the distance between the rotor housing and the tip widens too much, given that the Apex seals can not slide out to engage the housing. To counteract this, the engine either has to spin more rapidly (more on this in another article) or allow the engine to cool down to regain compression.

A different challenge arises when the engine has completely cooled. If the carbon deposits hinder the Apex seal from retracting into the rotor, the space between the housing and the seal becomes too tight. This results in quicker wear of the Apex seal, ushering in a vicious cycle that further aggravates the problem.

Oil Volume: A Critical Aspect

Was stuck APEX seals due to carob deposits the only issue? Unfortunately not for the early years. It appears that, especially in the early RX-8 engines, the volume of oil injected was either insufficient or misdirected. In a deviation from the RX-7 engine’s design, the early RX-8 models featured only two oil injectors per rotor, having removed the central injector, likely for emissions considerations. Later models (from 2009-2012, termed “Series 2”), which experienced fewer complications, saw Mazda reintroduce the central oil injector, bringing the total back to three per rotor.

For the earlier “Series 1” cars (from 2004-2008), retrofitting a third injector wasn’t feasible. As a workaround, Mazda introduced updated ECU software. Dealers were then able to reflash the ECU to increase the oil volume dispensed by the two existing injectors. However, this remedy might not have been ideal. Even with the added oil, it might not have dispersed evenly throughout the combustion chamber. In cases where it wasn’t fully combusted, this could potentially contribute to heightened carbon fouling. But, this is speculative.

So here we have early engines with potentially either too little oil entering the combustion chamber for lubrication, or an excess of oil in an attempt to reach parts of the rotating assembly that the third oil injector would have previously lubricated. Not ideal.

Summary

The above material outlines my understanding of the two primary root issues that have caused many RX-8 engines to fail in the field. Unfortunately, the list of factors that could contribute to the above issues and accelerate wear is a long one, which I hope to outline in my next post!

Thanks again for reading! 

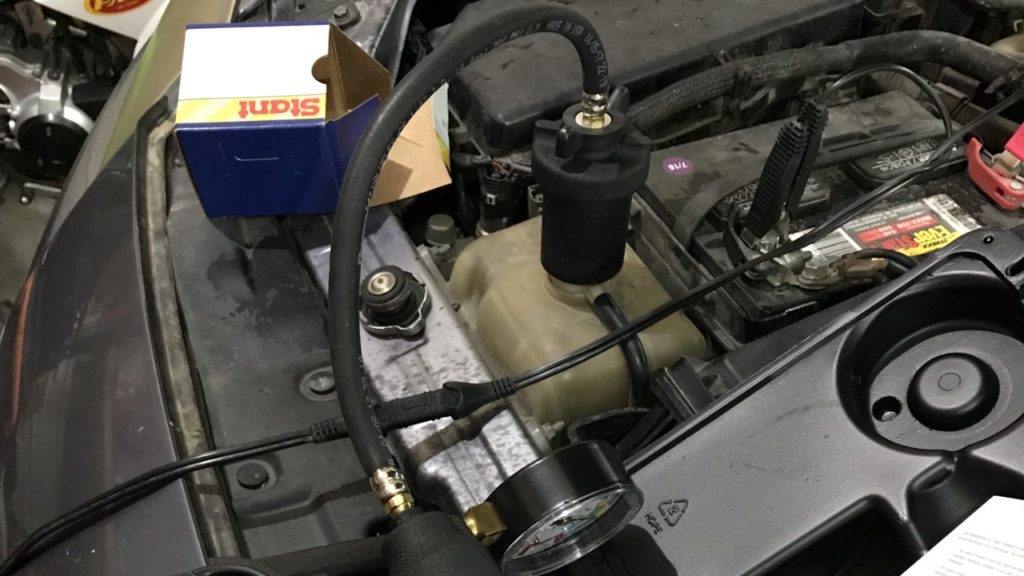
A picture of coolant system pressure testing my RX-8.

If you own an RX-8, at some point you will likely have to pressure check the cooling system. More on that in the future. Next time we will dig into the Mazda RX-8 Maintenance Nightmare!

Signs your RX-8 Rotary Wankel Engine is Failing

The story continues

In Part 1 of this series, a brief overview of the RX-8 was provided, and the core issue—engine failure—was uncovered. That article was intentionally kept short and to the point. The rationale is simple: if you’ve found the article, you likely already know what the RX-8 is and are more interested in understanding the rest of the story. In today’s post, I intend to outline some of the common signs that your RX-8’s Wankel engine may be failing. These signs include:

  • Trouble starting when hot
  • Misfires, indicated by a flashing check engine light
  • Milky oil dipstick (spoiler, it might not actually be a problem!)
  • A drop in fuel economy
  • Rough idle when the engine is warm
  • A glowing emanating from under the car

Trouble Starting When Hot

While there are several issues associated with the RX-8 engine, the most common sign of trouble is extended cranking time when the engine is hot, sometimes even leading to a complete failure to start. This is a sure indicator that your engine is failing, and it’s probably the number-one issue people search for on the internet! If you’re interested in learning what causes this and what you can do about it, stay tuned for future posts.

Misfires, Indicated by a Flashing  Check Engine Light (CEL)

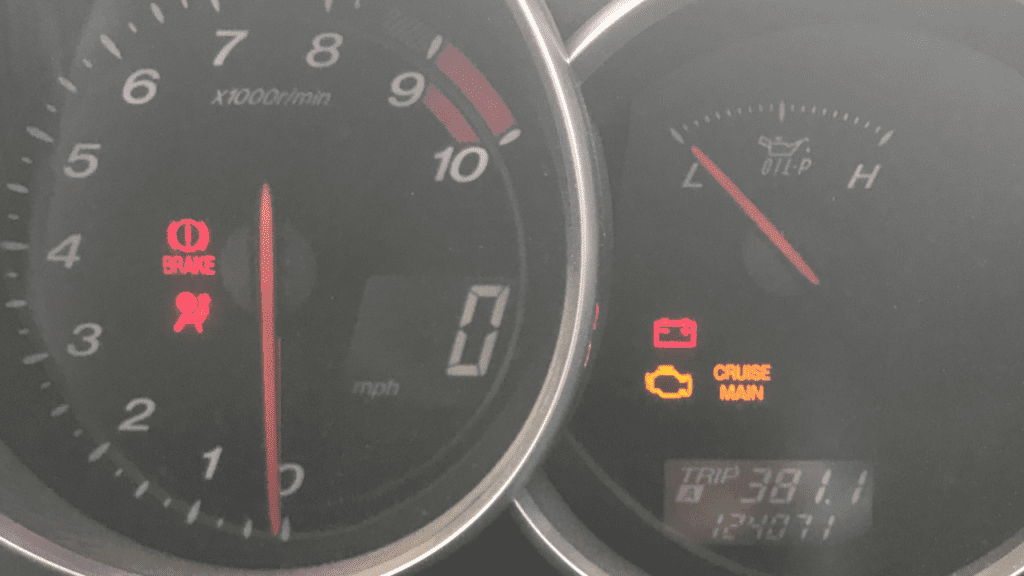
A quick note on check engine lights. It is a common misconception that a check engine will illuminate for any and all issues with a car. This is not the case (or at least it should not be). The check engine light is, in fact, a federal mandate from the EPA. Its primary purpose is to notify the driver of an emissions-related problem, urging them to address the problem as soon as possible.

When driving, if you notice a solid check engine light, it indicates a problem. Your vehicle may be emitting more pollutants than it should The official phrasing states, “your car may not be operating properly and could have a condition which wastes fuel, shortens engine life, or could lead to expensive repairs if left unaddressed. It could also be polluting the air.”

If on other hand, while driving, you observe a flashing or blinking check engine light, it signals: “a severe engine problem like a misfire is occurring which should be addressed quickly”. Why is a misfire particularly concerning? A misfire results in unburnt fuel passing through the engine and entering the exhaust system. That might not sound serious at first, but unburnt fuel reaching the catalytic convertor can cause permanent damage to it.

In essence, a blinking CEL indicates a catalyst-damaging condition that needs immediate attention. While it is technically possible to continue driving in this scenario, the longer you do so, the more damage you risk inflicting. Catalytic convertors are costly components, and damaging them is best avoided.

A compromised catalytic convertors does not just translate into a substantial replacement cost. They can lead to everything from a clogged exhaust system – increasing backpressure to hazardous levels –   to overheated catalysts that can glow visibly. Neither the engine nor its surrounding components are designed to tolerate  such extreme heat, paving the way for additional damage.

In summary, there are only two reasons you should ever see a check engine light: the issues mentioned above and during startup when it lights up to assure you it’s functional. 🙂

Milky Oil Dipstick

Observing a milky substance on your oil dipstick is not necessarily indicative of a problem, but it might suggest that your car is not reaching its full operating temperature. This phenomenon is most commonly observed during the winter due to the cooler temperatures and sometimes, higher humidity. The milky appearance results from a water/oil emulsion. Typically, the water originates from condensation forming in the vehicle’s sump.

Engaging in frequent short trips can exacerbate this issue, as the engine is not allowed to run at its normal operating temperature for long enough to evaporate or burn off the accumulated moisture. While in piston engines, such an issue could be a sign of a faulty head gasket, In the RX-8, it is relatively common. If the presence of it concerns you, consider taking your car on a longer drive to dissipate the moisture! Be warned, though: when it’s really cold outside, this might not fix the problem, as the RX-8’s cooling system is actually quite effective!”

A Drop in Fuel Economy

While the RX-8 is not exactly renowned for its  fuel economy (in the 3 years I ran a rotary I saw 14mpg to 22mpg with an average of 16.3 per tank), a noticeable decrease in your typical fuel mileage could indicate a decrease in engine compression, signaling the engine is on the bring of failure. The drop in efficiency arises because a lower compression means the engine is not functioning at its optimum level, thereby demanding more fuel per mile.

To better understand this, think of any engine as a pump – because, fundamentally that is what they are! If a pump’s seals aren’t sealing adequately, it will not be able to pump as much fluid with each stroke, the fluid will exit the pump at a decreased pressure. This diminished pressure illustrate the efficiency of the pump. In this analogy, the pressure correlates with the fuel economy you see (and in fluid dynamics gases are treated the same).

Rough Idle When Warm

Rotary engines,  especially the RX-8’s Renesis variant, are typically characterized by their buttery-smooth operation. This smoothness results from the fact that for every revolution of the engine, there are there combustion and compression cycles per rotor. This is unlike a four-stroke piston engine, which fires each piston every other revolution.

For a twin-rotor engine like the 13B, this equates to six firing events every complete revolution. However, it is important to note that the transmission input shaft on this engine, rotates at only 1/3 of this speed, thanks to the gearing relationship between the rotors and the eccentric shaft. In contrast, a four-piston engine would fire twice per revolution.

Consequently, if you observe any juddering or unevenness whilst idling, it is a definitive sign that something might be amiss, with ignition issues being a probable culprit.

Glowing Under the Car Post-Drive

Returning to the topic of catalytic convertors: if you notice a glow beneath your car after driving, particularly after intense or hard driving, it is a strong indication that your catalytic convertors overheating. This is serious concern and needs to requires immediate attention.

Conclusion

The points mentioned above are not an exhaustive list, but they are issues that I’ve experienced while running a rotary engine. I later discovered that many others have faced similar challenges. If you want to find out more, head over to RX8Club.com to delve deep into the community and read about other people’s experiences.

In my next post, I intend to explore what I understand to be the underlying causes of rotary engine failure.

Thanks for reading!

Next Article: Why did the Mazda RX-8 Engine Start Failing?

Picture of the RX8 dashboard with warning lights illuminated.

This was from my 2004 RX-8, yes I have had two! The small orange/yellow icon of the engine below the red battery one is the Check Engine Light (CEL)